 |
Amazing techniques which will transform your use of PowerPoint presentations. Make your presentation stand out from the crowd! |
|
|||||
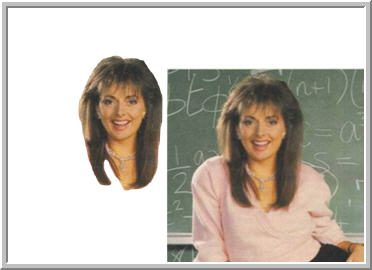
Cropping a Non Uniform Shape from a Picture People on the PowerPoint NG often ask how to crop a picture in PowerPoint. The crop tool provided will only crop rectangular shapes which is often not what is required. One solution often offered is to draw an auto shape, maybe circular and use a picture fill. This can work well but suppose that you want to crop eg just the head and shoulders from a picture? Impossible in PowerPoint? There are a few ways to do this but this is the way we suggest (normally we would use Photoshop but you may not have access to it) FIRST STEP Insert your picture onto the slide which should be otherwise blank. Make sure that grid and guides are OFF. It will look something like this:
STEP TWO Save the slide as a jpeg. Go to 'Save As' and in 'Save as Type' box choose jpeg. Save the current slide only. Now delete the original picture and use Format > Background > Fill Effects > Picture to set the jpeg as the backgroung image for the slide. The slide should look exactly the same as it did before except that the picture cannot be selected any more. STEP THREE Work at the highest magnification that allows you to see all of the image you need and use the scribble tool (from Draw > Autoshapes > Lines in version before 2007 or Insert > Shapes in 2007) and carefully trace around the part of the image that you need. When you are more proficient you may want to use the curve tool instead but it's a little harder to understand.
LAST STAGE When you have traced the image go to Format > shape and change its fill to 'Background' and its Line to 'No Line'. Now simply right click and 'Save as Picture' choosing PNG or EMF types. Insert the new picture. RESULT
|
|
|
|||
This website is sponsored by Technology Trish Ltd |
|||||


